Tuesday, February 16, 2021

 Finished! 

And I think he looks fabulous.  Just a reminder of the inspiration painting that inspired him ---


So the finished piece is different but definitely related.


I especially like the way that the gold fabric frames the black fabric that he was originally fused to and the way the hair explodes from one area to the next.  He still needs a name.....

The finished piece is about 24" x 24". 


Sunday, February 14, 2021

 More Changes in Design


This is the photo from the last post.  The one below shows the changes.  Check out the changes around the eyes and nose and lips.  I may still need to do a bit more around the chin. 


My goal with the paint and additional stitching was to make the shape of the nose stand out, reduce and blend the lower border for the eyes, add definition to the pupils, and make the lips and chin more distinct.  As I look at the photo on the computer I realize that I can be a bit more bold with the chin and lip outline and maybe add more white to the nose.  

I find it HARD to paint white on the nose but it does make a difference.  All of the sewing to secure the pieces is done including outlining each of spiky hair pieces.  Next step:  Quilting. 

Thursday, February 11, 2021

 Unanticipated Changes in Design


Well this is really a surprise.  It is interesting how certain projects take on their own personality and insist on going in new directions that the artist never anticipated.  Like this gentleman.  

I really did like him with no hair at all - and just on the smaller black background.  But then the energy around the project changed and he just "needed" hair.  And then the hair "needed" to go beyond the edge of the black fabric.  So the question became - should I make the black background larger or.... GO BOLD and add a border of bright gold fabric to allow the hair to escape and become an important part of the design.

I decided to be bold.  And I really really like the way the gold border adds energy  to the design and also enhances the golden colors of the face fabric.  Like it was meant to be!

Here is the funny part.  I am not a traditional quilter and I do not think in numbers - like inches and such.  So I needed to stretch my brain with determination to figure out how to straighten the edges of the black fabric that he was already fused onto and measure and seam the border accurately.  My goodness.  It makes me admire the ability of traditional quilters to think in that fashion.  And makes me glad that I can usually just be wild and crazy and not worry about numbers.  Ha!

The next stage is to start sewing all the edges of all the pieces down so they are secure.  This also adds a lot of structure and definition to the design.  I'll post before and after pics so you can see and compare.

Tuesday, February 9, 2021

 Moving from Paper and Fusing to Fabric


 And here he is fused onto that black piece of fabric you saw in the first post about this project.  The outline on the black fabric helps  to place the pieces correctly.  

I made some changes to the eyes and next to the nose before I moved all the pieces over.  It is easier to make the changes before you fuse the pieces down.  Although  I have at times fused a different piece over  the first one.  Maybe I will do that with his chin..... we'll see.

My next decision is whether or not to add hair.  He is just so stunning all by his bald little self that I am tempted to just leave him.  I also need to decide whether he will stay on a black background or move to a different fabric.

But he is starting to develop some personality.  And here is the thing that you don't know - there is still a lot of not just stitching (which adds a huge amount of definition) but also paint that will be added.  I'll tell you more about that as I add both of these details and can show you photos of the various stages to compare.

As I look at this photo I can see that the eyes are different sizes.... but that does reflect the actual painting so I am going to embrace this quirky feature on this guy.  He needs a name.... hmmmmm......


 Finding the Right Fabric

Finding the right fabric is always the most important step.  I pulled a stack of fabric that I thought might work but then I found this one.  It is an ombre print called Effervescence by Kaufman.  Gorgeous fabric made of zillions of circles.  And the colors fade from black to brown.  Isn't it just dazzling?

So I used ONLY this fabric for almost the entire face and chose light and dark sections to match the light and dark sections of the painting.  

And this is what he looks like.  The method to make this face was designed by Esterita Austin and I was privileged and thrilled to attend a three day in person class in Hot Springs Village several years ago.  She was inspiring and such a great teacher and I use her method all the time.  

It is complicated.  You have a freezer paper copy of the drawing and cut out a single section of the paper at a time and place the whole piece over the fabric and audition the fabric through the hole to find the right piece to cut out.  Then cut that little chunk out, add Misty Fuse to the back of the fabric, replace the paper and tape it in place and pin the fabric piece on top, then cut out another section and find the next piece.  WHEW!  It is not hard - but it is complicated and requires attention.


 Switching Gears to a Large NEW Project

The new project is a somewhat realistic portrait quilt.  A few weeks ago I started an online class focused on creating acrylic paintings of faces and figures.  The first several lessons were all about creating scribbly backgrounds and "finding" a face to paint over the background.  And the goal was to try to paint a face with emotional energy - and not necessarily a pretty face.

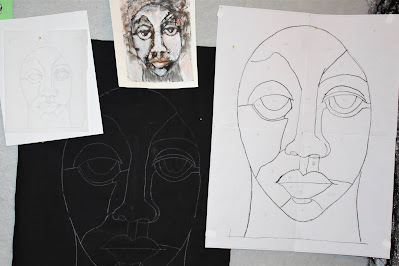
So my small paintings sat on my design wall for weeks and this one kept reaching out to me - to be made into a quilt.  He is the one at the top of the photo.

Sooooo - I listened and am attempting to make a quilt of this guy.  When I make quilts of faces I always work from photos so this is very different for me.  More difficult.

So this is how the process unfolds..... if you look closely you can see the tracing paper of the painting to the left, then the enlarged (with Rapid Resizer) copy of the tracing to the right, then the enlarged drawing traced onto black fabric using Transdoodle.  The face is about 14" x 22".


Thursday, February 4, 2021

 More Paper Dolls

Who knew that I would make several batches of paper dolls?  Not me!  But they sure are fun.  I am using a lot of the same materials that I used when I made the collages - just in a different way. 

 I don't think these will ever leave my house unless they travel to one of my friends as a surprise gift.  But they will certainly keep me company and make me smile for a while.

Even when I am making "in-between" projects, I know from experience that some of the things that I play with will work into my projects later.  

Do you like the octopus on the dolls head?

Tuesday, February 2, 2021

 Gentle Amusements

 " At the moment I'm in one of those cherished in-between moments where new projects are slowly incubating" - a quote from one of my favorite artist Lally Mille - seems to really describe how I am feeling.  A time for rest from large projects.  A time to relax and to sometimes just do little things that amuse me and make me smile.

So with that in mind I saw a video about making paper dolls and decided to dip into my drawers of paper and collage supplies and see what I could make.... 


They are only six inches tall but they are colorful and charming.  They stand securely - like a row of paper dolls.

I did learn some things from this first effort.  The necks are the weakest spot and I will add a hidden wire when I try the next time.  And the dresses could be slimmer.  But it was fun and I have  more faces just waiting to become dolls.  We'll see.....